Fort-Lune was Magnolia Arch's home on The Moon, after this location was destroyed by a powerful Ba'al, Magnolia departs for Luxendarc in-order to seek vengeance against the Ba'al.
Story[]
Fort-Lune was a base on The Moon that served for centuries as a line of defense between the world of Luxendarc and otherworldly creatures from afar named Ba'al. One day, after the events of Bravely Default an immensely powerful Ba'al that was unlike any other before it destroyed Fort-Lune, slaughtering every inhabitant besides two survivors: Magnolia Arch and her commander Vice President Appleberry. A year later, Magnolia and Appleberry would be able to salvage enough leftover supplies and resources to repair a lone vessel to which Magnolia would depart from Fort-Lune with and crash land in Gravemark Village of Eternia. There she would then have a fateful meeting with Yew Geneolgia and Edea Lee then set forth to locate the missing Ba'al that arrived in Luxendarc a year prior.
Fort-Lune Reconstruction sidequest[]
Bravely Second features a bonus activity in the form of Fort-Lune and villagers minigame. This is reminiscent of Norende Village within Bravely Default as its core gameplay mechanics remain the same
After Magnolia's crash landing in Gravemark Village, Magnolia enlist the aid of Yew and the rest of the party to help rebuild her homeland anew. To do this, the player can tap on the Moon icon on the sidebar at any time to view Fort-Lune. At the start, nothing is built and many bridges and paths need to be made in-order to have access to new facilities.
To rebuild Fort-Lune, the player will have to rely on villagers found through StreetPass or given by the Adventurer once a day by updating their data via the internet. The more villagers a player has, the faster tasks can get done. If the player has completed the special demo version of Bravely Second, they can transfer up to 20 villagers from the demo to their game file to assist in the rebuilding effort.
By rebuilding Fort-Lune, the player will have access to items and abilities not found anywhere else. They can trade with the Adventurer to shop at any of the facilities they have built, and every facility has multiple levels.
Below is a list of Facilities and Obstacles, and their details.
Obstacles[]
On Fort-Lune, there are various broken bridges and paths that serve as obstacles to reach the other facilities. Until they are repaired, the player will not have access to them.
| Obstacle | Required Time | Available | Unlocks |
|---|---|---|---|
| Copernicus Bridge | 1 hour (1:00) | Available by Default | Trigger Lab Parts Lab α |
| Apollonius Bridge | 5 hours (5:00) | Available by Default | Special R&D Lab α |
| Tycho Pass | 30 hours (30:00) | Fix Copernicus Bridge | Parts Lab β Munitions Factory |
| Clavius Access Road | 50 hours (50:00) | Fix Apollonius Bridge | Parts Lab ɣ Bioplant |
| D'Arrest Tunnel | 70 hours (70:00) | Fix Appollonius Bridge | Parts Lab δ |
| De Sitter Overpass | 99 hours (99:00) | Fix Copernicus Bridge | Special R&D Lab β |
Facilities[]
Facilities are built over time by enlisting the aid of villagers earned via StreetPass or updating your data over the internet. There are four major types of facilities on Fort-Lune such as: item workshops, shipyards, bioplants, and special move research labs.
Pharm-lab[]
| Level | Required Time | Unlocks |
|---|---|---|
| 1 | 15 minutes (0:15) | Potion Teleport Stone |
| 2 | 1 hour (1:00) | Antidote Eye Drops |
| 3 | 2 hour & 30 minutes (2:30) | Echo Herbs Wakeup Bell |
| 4 | 3 hours & 30 minutes (3:30) | Phoenix Down |
| 5 | 5 hours (5:00) | Hi-Potion |
| 6 | 8 hours (8:00) | Ether |
| 7 | 11 hours (11:00) | Balsam |
| 8 | 15 hours (15:00) | Remedy |
| 9 | 24 hours (24:00) | X-Potion |
| 10 | 36 hours (36:00) | Turbo Ether |
Trigger Lab[]
| Level | Required Time | Unlocks |
|---|---|---|
| 1 | 1 hour & 30 minutes (1:30) | Brave |
| 2 | 3 hours (3:00) | Default |
| 3 | 5 hours & 30 minutes (5:30) | Heal |
| 4 | 11 hours (11:00) | Magic |
| 5 | 22 hours (22:00) | Slayer |
| 6 | 30 hours (30:00) | Attacker |
| 7 | 36 hours (36:00) | Critical |
| 8 | 45 hours (45:00) | Item |
| 9 | 60 hours (60:00) | Exploit |
| 10 | 72 hours (72:00) | Damage |
Parts Lab α[]
| Level | Required Time | Unlocks |
|---|---|---|
| 1 | 2 hours (2:00) | Fire Fire Res Up Fire Res Down |
| 2 | 3 hours (3:00) | Water Water Res Up Water Res Down |
| 3 | 5 hours & 30 minutes (5:30) | Lightning Lightning Res Up Lightning Res Down |
| 4 | 9 hours (9:00) | Wind Wind Res Up Wind Res Down |
| 5 | 15 hours (15:00) | Earth Earth Res Up Earth Res Down |
| 6 | 26 hours (26:00) | Speed Up Speed Down |
| 7 | 42 hours (42:00) | Light Light Res Up Light Res Down |
| 8 | 60 hours (60:00) | Evade Up Accuracy Down |
| 9 | 90 hours (90:00) | Dark Dark Res Up Dark Res Down |
| 10 | 99 hours (99:00) | Cure Doom Doom Res Up Death Res Up |
Special R&D Lab α[]
| Level | Required Time | Unlocks |
|---|---|---|
| 1 | 2 hours (2:00) | Piercing Bolt |
| 2 | 2 hours (2:00) | Rejuvenation Infinity |
| 3 | 2 hours (2:00) | Moonshadow Grand Strike |
| 4 | 2 hours (2:00) | Horizon Laser Discharge |
| 5 | 3 hours (3:00) | Maximum Draw Moonbeam Limit Break |
| 6 | 24 hours (24:00) | Sword Dance Withering Wave |
| 7 | 24 hours (24:00) | Acid Rain Blade Storm |
| 8 | 24 hours (24:00) | Breaking Wave Maelstrom |
| 9 | 24 hours (24:00) | Overpower Spider's Web |
| 10 | 36 hours (36:00) | Cursed Arrow Qigong Wind Air Splitter |
Parts Lab β[]
| Level | Required Time | Unlocks |
|---|---|---|
| 1 | 1 hours & 30 minutes (1:30) | HP Recovery Lv 1 Poison Touch Poison Res Down |
| 2 | 3 hours (3:00) | MP Recovery Lv 1 Blind Touch Blind Res Down |
| 3 | 5 hours & 30 minutes (5:30) | HP Recovery Lv 2 Silence Touch Silence Res Down |
| 4 | 11 hours (11:00) | MP Recovery Lv 2 Sleep Touch Sleep Res Down |
| 5 | 22 hours (22:00) | HP Recovery Lv 3 Paralyze Touch Paralyze Res Down |
| 6 | 32 hours (32:00) | MP Recovery Lv 3 Dread Touch Dread Res Down |
| 7 | 42 hours (42:00) | HP Recovery Lv 4 Stop Touch Stop Res Down |
| 8 | 60 hours (60:00) | MP Recovery Lv 4 Confuse Touch Confuse Res Down |
| 9 | 90 hours (90:00) | HP Recovery Lv 5 Charm Touch Charm Res Down |
| 10 | 99 hours (99:00) | MP Recovery Lv 5 Death Touch Death Res Down |
Munitions Factory[]
| Level | Required Time | Unlocks |
|---|---|---|
| 1 | 1 hours (1:00) | Bomb Fragment |
| 2 | 2 hours & 30 minutes (2:30) | Antarctic Wind Magnifying Glass |
| 3 | 4 hours & 30 minutes (4:30) | Zeus's Wrath |
| 4 | 8 hours (8:00) | Tengu Yawn Catch Me Conch |
| 5 | 14 hours (14:00) | Earth Drum |
| 6 | 26 hours (26:00) | Bomb Arm Spider's Web |
| 7 | 35 hours (35:00) | Arctic Wind |
| 8 | 56 hours (56:00) | Pantheon's Wrath Stopwatch |
| 9 | 76 hours (76:00) | Tengu Sneeze |
| 10 | 84 hours (84:00) | Earth Mallet Enopu Mushroom |
Parts Lab ɣ[]
| Level | Required Time | Unlocks |
|---|---|---|
| 1 | 1 hours (1:00) | Beast Slayer Cure Poison Poison Res Up |
| 2 | 2 hours & 30 minutes (2:30) | Plant Slayer Cure Blind Blind Res Up |
| 3 | 4 hours & 30 minutes (4:30) | Aquatic Slayer Cure Silence Silence Res Up |
| 4 | 8 hours (8:00) | Insect Slayer Cure Sleep Sleep Res Up |
| 5 | 15 hours (15:00) | Flier Slayer Cure Paralyze Paralyze Res Up |
| 6 | 26 hours (26:00) | Undead Slayer Cure Dread Dread Res Up |
| 7 | 42 hours (42:00) | Demon Slayer Cure Berserk Berserk Res Up |
| 8 | 52 hours (52:00) | Dragon Slayer Cure Stop Stop Res Up |
| 9 | 81 hours (81:00) | Crit Rate Up Cure Confuse Confuse Res Up |
| 10 | 99 hours (99:00) | Cure K.O. Cure Charm Charm Res Up |
Bioplant[]
| Level | Required Time | Unlocks |
|---|---|---|
| 1 | 1 hours (1:00) | Beast Flesh Genoise Chantilly |
| 2 | 2 hours & 30 minutes (2:30) | Roc Filet Streusel |
| 3 | 4 hours (4:00) | Leviathan Sashimi Zeste |
| 4 | 6 hours (6:00) | Cat Feather Biscuit Nappage |
| 5 | 10 hours (10:00) | Dragon Steak Vanille |
| 6 | 20 hours (20:00) | Rare Cheese Cannelle |
| 7 | 28 hours (28:00) | Dried Remora Feuilletage Fraise |
| 8 | 40 hours (40:00) | Monoceros Flakes Chocolat |
| 9 | 54 hours (54:00) | Tender Victuals Bombe |
| 10 | 72 hours (72:00) | Catnip Anglaise Amande |
Parts Lab δ[]
| Level | Required Time | Unlocks |
|---|---|---|
| 1 | 3 hours (3:00) | Power Boost Lv 1 +1 Turn |
| 2 | 5 hours (5:00) | M.Atk Up M.Atk Down |
| 3 | 7 hours & 30 minutes (7:30) | Power Boost Lv 2 +2 Turns |
| 4 | 15 hours (15:00) | P.Atk Up P.Atk Down |
| 5 | 24 hours (24:00) | Power Boost Lv 3 +3 Turns |
| 6 | 32 hours (32:00) | M.Def Up M.Def Down |
| 7 | 42 hours (42:00) | Power Boost Lv 4 +4 Turns |
| 8 | 75 hours (75:00) | P.Def Up P.Def Down |
| 9 | 99 hours (99:00) | Power Boost Lv 5 BP Bonus Lv 1 |
| 10 | 99 hours (99:00) | BP Bonus Lv 2 +5 Turns |
Special R&D Lab β[]
| Level | Required Time | Unlocks |
|---|---|---|
| 1 | 48 hours (48:00) | Sonic Wave Tempest Fang |
| 2 | 48 hours (48:00) | Lux Perfect Circle |
| 3 | 48 hours (48:00) | Petal Swirl Gigation Swing |
| 4 | 48 hours (48:00) | Meggiddo Flame Trigger Happy |
| 5 | 72 hours (72:00) | Rapid Fire Ascendant Palm Cross Crusher |
| 6 | 72 hours (72:00) | Bolt Storm Holy Weapon |
| 7 | 72 hours (72:00) | Divine Light Cross Divide |
| 8 | 72 hours (72:00) | Autumn Brocade Tyrant's Lore |
| 9 | 72 hours (72:00) | Grazioso Assault Mission |
| 10 | 99 hours (99:00) | Angelic Pillar Thunderburst Supernova |
Ba'al (Nemeses)[]
.png)
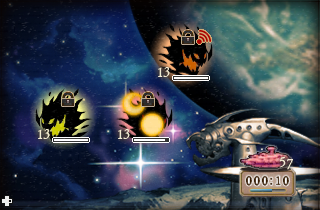
Fort-Lune Ba'al
Fort-Lune also features Nemeses, similar to Norende Village from Bravely Default, which are challenging monsters for the party to fight. They can be obtained by using StreetPass or updating your data via the Internet. The player can gain rewards for fighting and killing these, but because some high-level Nemeses can be obtained very early on in the game, it is strongly advises the player should wait until they reach the monster's level to take it down.
Up to 7 Nemeses can appear in Fort-Lune at any one time, after which the oldest Nemesis will be removed unless protected.
Nemeses can also be sent directly by the game's developers, and can be found by updating data in the save menu. The player can also send a Nemesis to other people by clicking on a Nemesis and hitting send.
List of Ba'al:
- Firstborn
- Ba'al i Turtle Dove
- Ba'al ii Redshirt
- Ba'al iii Appariti
- Ba'al iv Goldie
- Ba'al v Urchin
- Ba'al vi Snowcap
- Chompillionaire
Ba'al Buster Ships[]
.png)
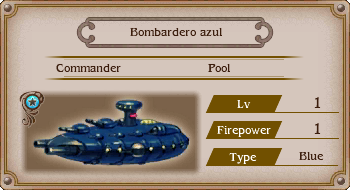
Blue Ba'al Buster Ship
After unlocking Ba'als during Chapter 1, the player is given the option to level up and send off Buster Ships. With each Lvl gained, Buster Ships will gain cumulative Firepower that can be used to weaken Ba'als and lower their respective Lvls and stats to a manageable degree in-order to be defeated.
Each player's own Buster Ship's color is determined by their 3DS's console ID, so any friend's Buster Ship that is obtained via StreetPass or updating your game's data via the internet may have a different colored Buster Ships than your own. Using Buster Ships of the same color to target and attack the same Ba'al will result in a bonus towards Firepower.
The possible colors for Buster Ships are as follows[1]:
- 00 - Red
- 01 - Orange
- 02 - Yellow
- 03 - Green
- 04 - Blue
- 05 - Purple
- 06 - White
※ Note - the numbers to the left of the colors correspond to their listed Hexidecimal IDs within the game.